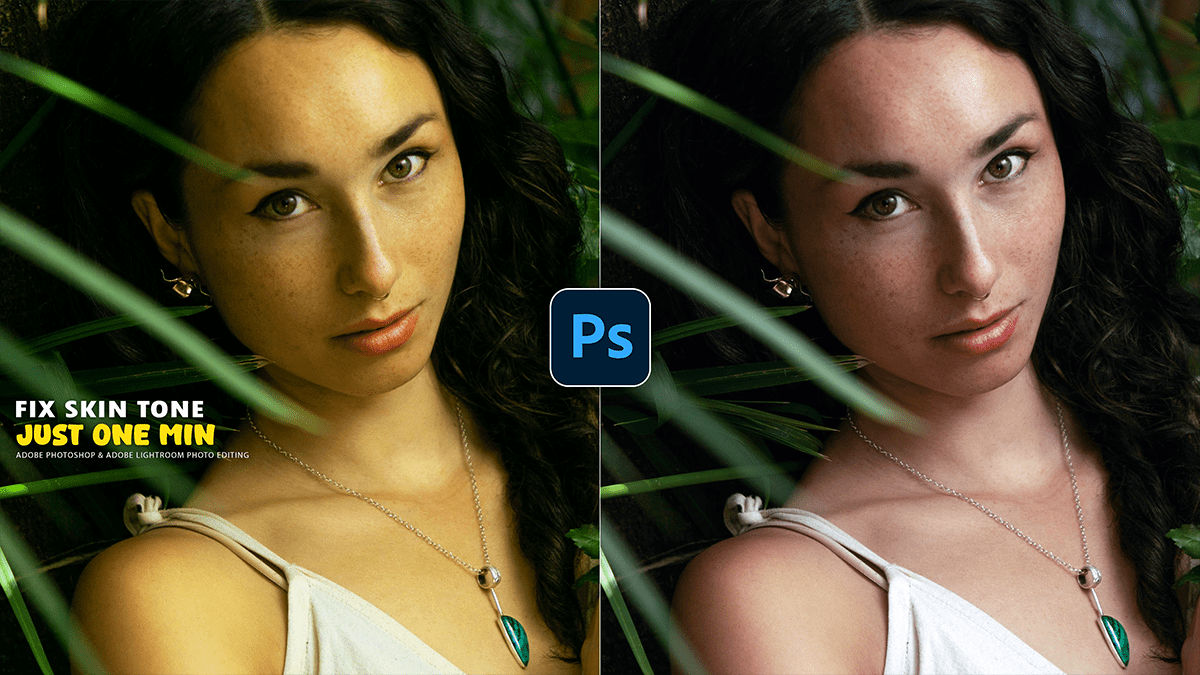
Learn: How to Fix Skin Tone in Adobe Photoshop 2025,
Therefore, Correcting skin tone in Adobe Photoshop can be done using a variety of methods, from simple adjustments to more advanced techniques. The best method often depends on the specific image and the severity of the color cast. In other words, Here are some of the most common and effective ways to fix skin tone in Photoshop:
How to Fix Skin Tone in Adobe Photoshop 2025,

Method 1: Selective Color:
Therefore, This is a powerful and precise method for targeting specific color ranges.
- Add a Selective Color Adjustment Layer: Go to the Layers panel and click on the “Create new fill or adjustment layer” icon (it looks like a half-black, half-white circle). Select “Selective Color.”
- Choose the Target Color: In the Properties panel for the Selective Color layer, use the “Colors” dropdown menu. For most skin tones, you’ll want to start with “Reds” and/or “Yellows.”
- Adjust the Sliders:
- Cyan: Therefore, To reduce a red or magenta cast, drag the Cyan slider to the right. To increase redness, drag it to the left.
- Magenta: To reduce a green cast, drag the Magenta slider to the right. To add more green, drag it to the left.
- Yellow: Therefore, To reduce a yellow or orange cast, drag the Yellow slider to the right. To add more yellow, drag it to the left.
- Therefore, Make subtle movements and observe the effect on the skin. You can also switch between “Reds” and “Yellows” to fine-tune your adjustments.
Step 2: Color Balance:
In other words, This is a quick and intuitive way to correct a color cast.
- Add a Color Balance Adjustment Layer: From the Adjustment Layers icon in the Layers panel, choose “Color Balance.”
- Select a Tone Range: In the Properties panel, you can choose to adjust “Midtones,” “Highlights,” or “Shadows.” Starting with “Midtones” is usually the most effective for skin.
- Use the Sliders: Drag the Cyan/Red, Magenta/Green, and Yellow/Blue sliders to shift the colors. For example, if the skin is too red, drag the Cyan/Red slider towards Cyan. If it’s too yellow, drag the Yellow/Blue slider towards Blue.
Learn: How to Fix Skin Tone in Adobe Photoshop 2025,
Method 3: Hue/Saturation:
In other words, This method is great for making broad adjustments to a specific color range.
- Add a Hue/Saturation Adjustment Layer: Click the Adjustment Layers icon and select “Hue/Saturation.”
- Select the Skin Tone Range: In the Properties panel, change the dropdown menu from “Master” to “Reds” or “Yellows.”
- Adjust the Sliders:
- Hue: Shifts the overall color.
- Saturation: Controls the intensity of the color.
- Lightness: Adjusts the brightness.
- You can also use the Eyedropper tool to select a color on the skin to target it more precisely.
Step 4: Curves:
In other words, The Curves adjustment layer offers a high level of control and is often used by professionals.
- Add a Curves Adjustment Layer: Click the Adjustment Layers icon and select “Curves.”
- Select a Channel: In the Properties panel, change the dropdown from “RGB” to “Red,” “Green,” or “Blue.”
- Make Adjustments:
- However, To correct a red cast, go to the “Red” channel and drag the curve downwards.
- For instance, To fix a green cast, go to the “Green” channel and drag the curve downwards.
- However, To correct a blue cast, go to the “Blue” channel and drag the curve upwards.
- For instance, You can also use the “Targeted Adjustment Tool” (the hand icon with an arrow) and click and drag on the skin to adjust the curve.
Learn: How to Fix Skin Tone in Adobe Photoshop 2025,
General Best Practices:
- Work on a Separate Layer: Always use adjustment layers instead of making destructive changes directly to your image layer. This allows you to go back and make changes at any time.
- Create a Layer Mask: After applying an adjustment layer, you can use a layer mask to apply the effect only to the skin and not to the rest of the image.
- For instance, After adding the adjustment layer, the mask will be a white thumbnail next to the layer icon.
- Above all, Select the mask thumbnail and press Ctrl + I (Windows) or Cmd + I (Mac) to invert it to black, which hides the effect.
- For instance, Use a soft, white brush to paint over the skin areas where you want to apply the correction.
- Use the Eyedropper Tool: Before you start, use the Eyedropper tool (set to a “5×5 Average” sample size) to sample the skin tone in different areas (highlights, midtones, and shadows). This gives you a good sense of the current color values and helps you make more precise adjustments.
- Know Your Color Theory: Remember that colors have opposites. For example, Cyan is the opposite of Red. This is key when using tools like Selective Color and Color Balance.
- Trust Your Eye, but Use Numbers as a Guide: While there are general rules for skin color values (especially in CMYK), they are only guidelines. The final look depends on the lighting, the subject, and the desired aesthetic. It’s more important to make the image look natural and pleasing to the eye.