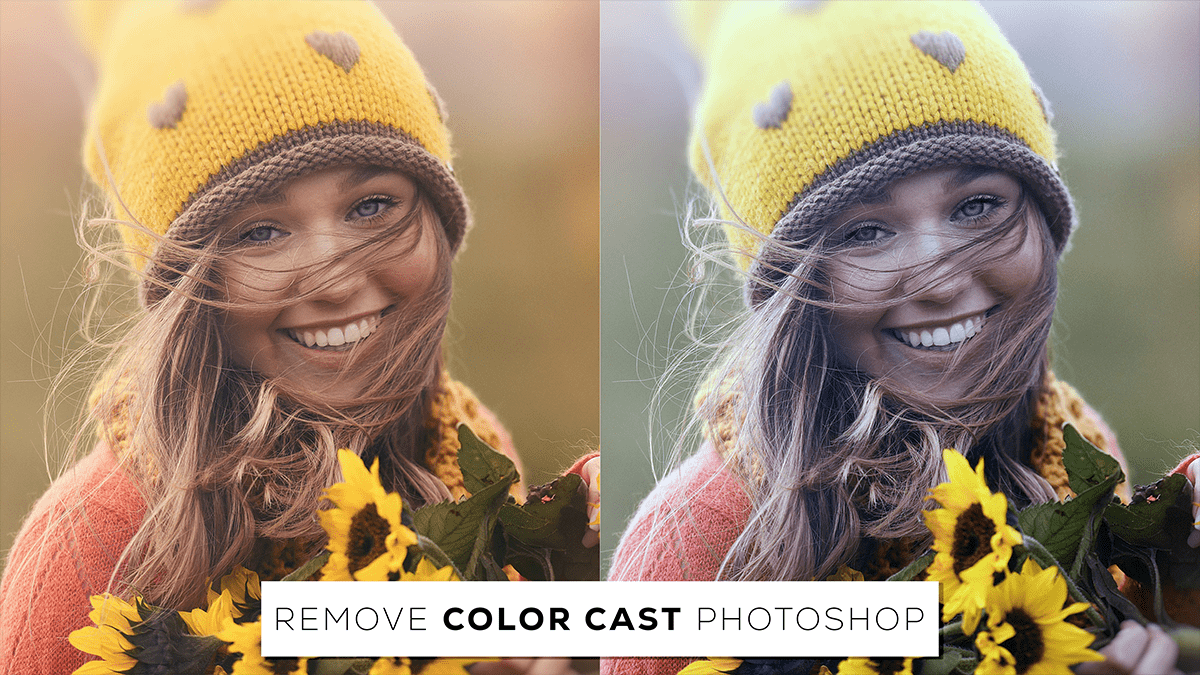
Remove Color Cast Photoshop 2024, How to Fix Image Color in Adobe Photoshop.

Therefore, In this Photoshop tutorial, you learn, How to Fix any image color or, white balance in Photoshop.
Method Number One:-
In other words, To remove a color cast in Photoshop, follow these steps:
Open your image in Photoshop.
Duplicate the background layer by right-clicking on the layer and selecting “Duplicate Layer.” Rename the new layer to “Color Correction” if you’d like.
Remove Color Cast Photoshop 2024,
With the new “Color Correction” layer selected, go to the menu bar and click on “Image” > “Adjustments” > “Color Balance.”
However, In the Color Balance dialog box, you will see three color channels: “Highlights,” “Midtones,” and “Shadows.” Adjust the sliders under each channel to neutralize the color cast. Typically, you’ll want to move the sliders towards the middle or away from the color cast.
Click here to watch this video tutorial,
For example, if your image has a greenish tint, move the “Shadows” slider for cyan toward the middle of the green side towards the opposite (red) side.
Above all, Preview your changes by clicking on the “OK” button. If the color cast is still present, you might need to repeat these steps using other adjustment tools like “Levels” or “Curves.”
Once you’re satisfied with the color correction, click “OK” to apply the changes.
If necessary, you can further fine-tune the color balance by adjusting the opacity of the “Color Correction” layer.
Save your work.
Remember that color correction is subjective, and it’s essential to make adjustments that suit your specific image and artistic vision.
Method Number One:-
How to Easily Remove Color Casts in Photoshop 2024
To easily remove color casts in Photoshop, follow these steps:
Open your image in Photoshop.
After that, Duplicate the background layer by right-clicking the layer and selecting “Duplicate Layer.”
Name the new layer “Color Correction” and click “OK.”
With the “Color Correction” layer selected, go to the menu bar and click “Image” then “Adjustments” and choose “Color Balance.”
In the “Color Balance” dialog box, you’ll see three color channels: “Highlights,” “Midtones,” and “Shadows.” Adjust these channels to remove the color cast.
To remove a warm (yellow/orange) cast, select the “Highlights” option and move the sliders for “Yellows” and “Red” towards the “Cyan” and “Magenta” sides, respectively. For a cool (blue) cast, move the sliders for “Cyan” and “Magenta” towards the “Yellows” and “Red” sides, respectively.
Learn, Professional Photo Editing,
In the “Midtones” section, make similar adjustments as you did for the “Highlights” to further refine the color balance.
In the “Shadows” section, adjust the sliders to counteract the color cast in the darker areas of your image.
Preview your changes by clicking the “OK” button. Therefore, If you’re satisfied with the results, click “OK” again to apply the adjustment. If not, click “Cancel” to revert the changes.
If necessary, you can now adjust the opacity of the “Color Correction” layer to blend the corrected colors with the original image.
By following these steps, you should be able to easily remove color casts from your images in Photoshop.
