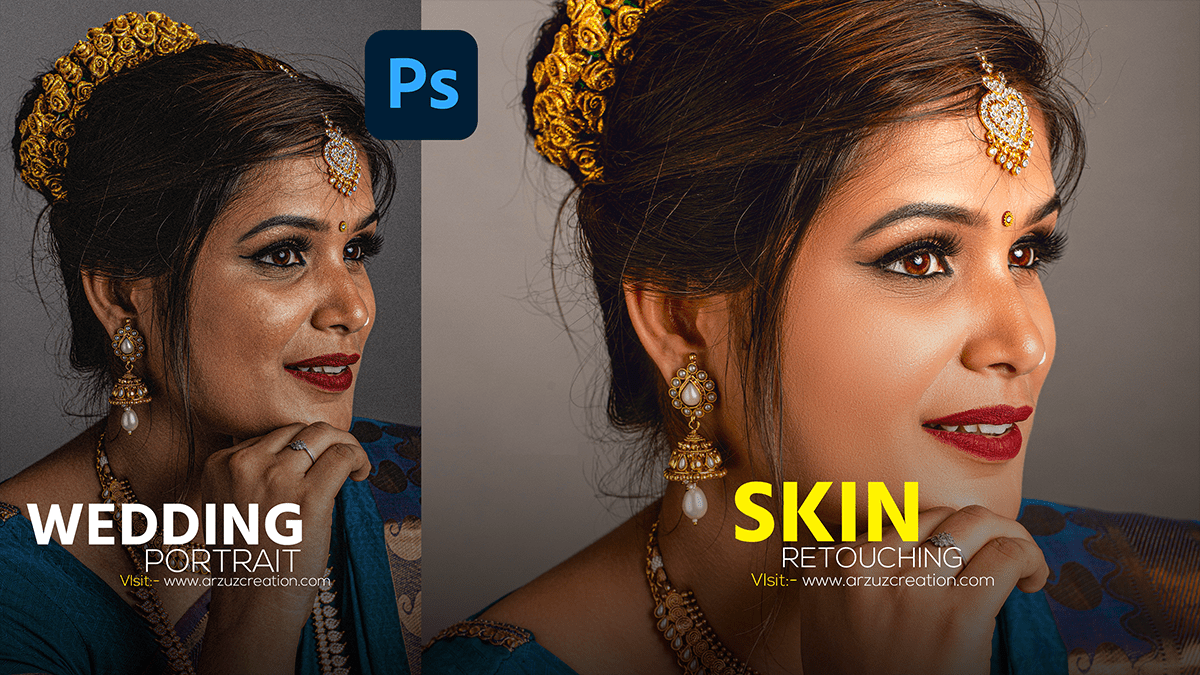
How to Retouch Skin in Photoshop, Learn the Wedding Photo Retouch Technique From Here,
How to Retouching Skin in Portraits Using Frequency Separation Process,
I think knowing how to smooth skin in Adobe Photoshop is a good skill. I shoot portraits of models or senior models, but it’s my job to make my model look amazing or present her portrait beautifully. These include removing facial blemishes, changing eye color, changing lip color, and resurfacing the skin to smooth out any imperfections.
Many advanced restorers of model portraits, glamour, and model photography spend hours in Adobe Photoshop in front of their computers to smooth skin and cellulite and remove blemishes. Even using many Photoshop plugins takes a lot of time. For them today is my skin retouching Photoshop tutorial.

Different Ways to Smooth Skin & Restore Skin in Adobe Photoshop 2023,
In this Photoshop tutorial, I will show you how to remove and smooth a person’s skin blemishes, smooth skin, and blackheads in Adobe Photoshop 2023. I’ll start with a simple process that will quickly create silky skin retouching on another portrait photo. Then I’ll show you more Adobe Photoshop Advanced Processes that are used by many processes and very nicely smooth the skin.
As with any Adobe Photoshop Tutorial, it’s a good idea to follow the step-by-step skin retouching procedure. So now open Grab Image, open Adobe Photoshop, and let’s go!

How to Remove Blemishes in Adobe Photoshop 2023,
I always start image adjustments by removing temporary blemishes from photos as this makes face smoothing very easy and beautiful. These include acne, discoloration or scratches, and black spots. I usually don’t remove any permanent features unless, because no stain can be done permanently. Freckles, scars, moles, and other beauty marks play a unique role in expressing each person’s natural portrait.
I have opened a beautiful model portrait photo here to do the job. I’m going to zoom in on the model’s face ( Ctrl+ ) to do the job. Or, move the mouse scroll bar upwards to zoom in on the photo.
I always make a copy of my photo on a new layer in Photoshop by layer and name it “Blemish Removal“. I think it’s a good practice to create a new layer with every change in Adobe software. Because this new layer ensures that you can easily go back and modify previous steps. Or you can try out your different methods and compare the differences but, by creating each layer you won’t be able to work in the same way.
If you’ve never created a duplicate layer before, go to Layer > Duplicate Layer by clicking the right mouse button. Select the layer and press Ctrl or Cmd + J to create a new layer.
First, I’m now going to work through the Spot Healing Brush Tool. You will see the icon in the Photoshop toolbar and you can get more icons by right-clicking on this icon. I’ll use a soft brush to remove the spots from the face here ( I’ll use about 35% hardness ) which is set to my content-aware fill beforehand, you can change that if you want.

Remove Blemishes Using The Healing Brush Tool,
Now I set the brush size to the spot I’m erasing first. We will make the size of the brush smaller and bigger to remove the spots on the face perfectly. I [ ] can easily change the size of the brush using this bracket key and you can try it too.
Now, click on any one of the spots on the face. You will see like magic, it is gone, this way we will remove all the stains one by one!
Adobe Photoshop uses information from the spot’s surrounding area to remove the spot and make it disappear seamlessly. If the stain doesn’t disappear completely after erasing the stain, use the Bracket key to enlarge the brush size and click on it again.
Skin Retouch, Spot Healing Brush Tool,
I always click spots until I replace each spot with clear skin. As long as it’s fresh I can’t remove the stains.
If you want more control over the brush tool I’m using, or if the spot healing brush doesn’t give you the look you want, use the healing brush tool. You can find other brush tools very easily. Click on the brush tool icon and you will see other brushes.
Now watch this video 📹 tutorial and click on the video tutorial button to learn the work.
After you activate the Healing Brush tool, I use the Option key ( Alt key on PC ) to select a clear area of skin near the scar, which I will place over the scar. That varies in skin texture and color. A forehead may have a different texture than the cheeks because the skin on the face is not the same. To keep the texture of our skin, I always try to match the skin tone and texture as closely as possible.
Removing blemishes in Photoshop goes a long way to smoothing out my model’s skin. Before and After pictures have been compared.


How to Smooth Skin with Photoshop,
Above all, Today I will show you three ways to smooth skin in Adobe Photoshop. After that, The first two portrait steps are easier for beginner photographers and more suitable for professional photo editing. The last one is a more advanced method, but it retains the texture of the skin very well.
In addition, All procedures add opacity to the skin, which gives the skin a silky smoothness. And gives the skin a silky natural look.
Using the Blur tool, Skin Retouch in Photoshop,
After that, The easiest way to smooth skin in Adobe Photoshop is to blur the skin using the Blur tool. Therefore, This tool looks like a drop of water in the Adobe Photoshop toolbar, which we can use to blur photos. Smoothing skin is very easy with this tool, but the tool doesn’t give you much control over the smoothing effect because overly smooth skin looks ugly.
Step One:-
In step one we will create a new layer and name it “Blemish Removal“. Now we will select this layer and copy it to a new layer. ( Ctrl or Cmd + J ) to create a duplicate layer. After the new layer is created, name it “Smooth Skin“
Step Two:-
In step two we will add blur only to the face. And to add this blur we’ll select the Blur tool from the Photoshop toolbar and make sure the percentage is set to 100%

Then I will paint the blur directly on the skin of the model very carefully. Because the effect of face blur only applies to the skin and not anywhere else. I am always very careful to avoid adding blur or blur from eyes, hair, lips, background, or clothing.
If the effect of the amount of blur added is too strong, we can use this shortcut key to undo the blur tool ( Ctrl or Z ) or reduce the percentage from the above setting.
How we use the Photoshop Blur Filter,
To add more control over the blur softening effect, a Filter Blur can be used instead of the Photoshop Blur tool. In my opinion, you can use Gaussian blur or surface blur to create a smooth effect, which I think will give you the best result.

Moreover, Gaussian blur adds a more romantic touch to portraits because with Gaussian blur we are able to create real blur. Now you compare both types of ambiguity and choose an option of your choice to do the job.
First Step:-
First step you create a new layer named “Blemish Removal” Select the layer and create a new layer from that layer. Use the shortcut key Layer > Duplicate Layer ( Ctrl or Cmd + J ) to create this new layer. I even named the new layer “Smooth Skin“

Second Step:-
In the second step, you add ambiguity
Go to the Photoshop Filters dropdown menu. Then select Gaussian Blur from Blur. Select the Radius as per your preference which will give the best result with your photo.

After that, I think you don’t need too much blur because a little blur gives a good result. Depending on the resolution of your photo, a radius of five to 10 pixels should be kept. Also, reduce the layer opacity to 50% or 40%. Firstly, And yes if you add too much blur, the skin texture of your photo face will come out and the photo will not look normal or natural.
Skin Retouch in Photoshop
Secondly, You’ll get a slightly different look if you use Photoshop Surface Blur ( Filter > Blur > Surface Blur ), but the Photoshop Surface Blur process is the same as when adding Gaussian blur. Also, I used a Radius of 69 and a Threshold of 32 to start with because this setting gives a good result in my portrait photos.
Then Invert the Blur effect,
Continue text coming soon… wait
